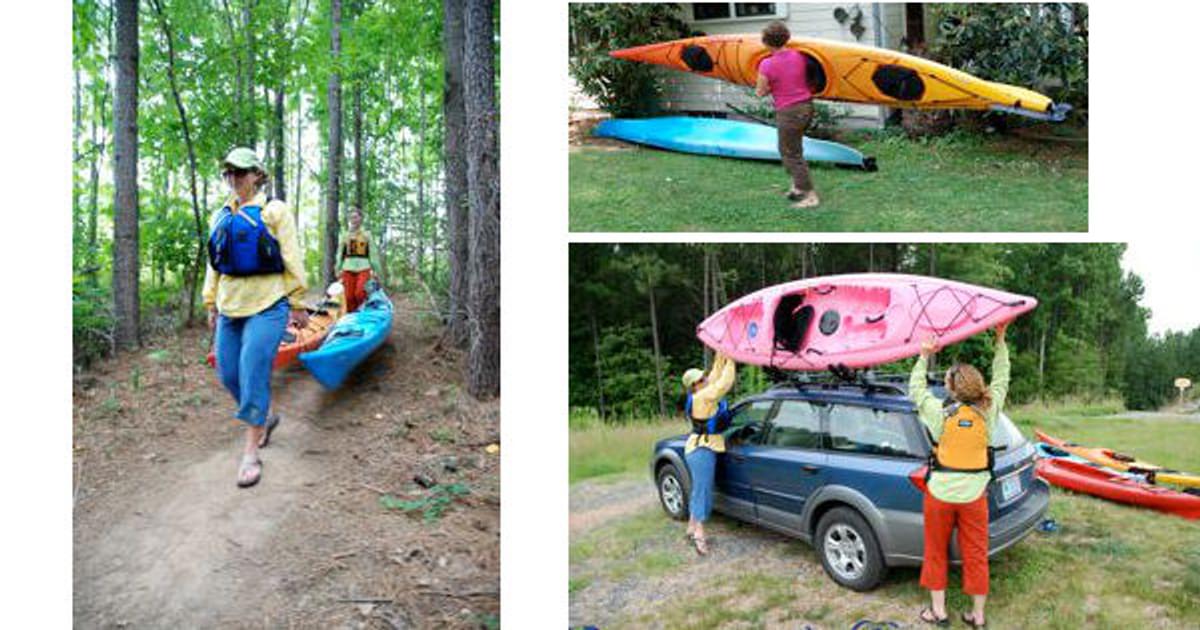
To lift a kayak, bend your knees, keep your back straight, and use your legs for power. Always carry the kayak by the hull or handles, not the combing or accessories.

Lifting and carrying a kayak might seem daunting due to its size and weight, but with the correct technique, it's manageable for most paddlers. Transporting your kayak is an essential part of the adventure, and doing it properly ensures your safety as well as the preservation of your gear.
The key is to understand the best strategies to avoid strain or injury. This introductory guide provides you with a clear, straightforward approach to moving your kayak from storage to the shoreline with confidence. From solo to tandem lifts, it covers practical methods to handle your craft with ease. Read on to master the art of kayak handling and make your next trip to the water smooth and worry-free.
Essentials Of Kayaking Safety
Kayaking calls for more than just paddling through waters; it’s about safety first. Knowing how to manage your kayak and yourself in various conditions is crucial. It ensures enjoyable and secure adventures every time you set out on the water.
Gear And Attire
Right gear and attire make a significant difference in kayaking safety. Essentials include:
- Life Jacket: Always wear a US Coast Guard-approved life vest.
- Helmet: Protects your head in rocky or rapid waters.
- Wet Suit or Dry Suit: Choose based on the water temperature.
- Gloves: Improve grip and protect hands from blisters.
- Water Shoes: Offer grip on wet surfaces and protect feet.
Personal Floatation Devices (PFDs) should fit snuggly and be suitable for the kayaker's weight and size.
Reading Weather And Water Conditions
Understanding weather and water conditions is vital for a safe kayaking trip. Points to consider:
- Weather Forecasts: Check before departure to avoid storms.
- Water Temperature: Cold waters require thermal protection.
- Wave Height: High waves can be dangerous for beginners.
- Wind Speed: Strong winds make navigation tougher.
- Currents: Be aware of the strength and direction of water currents.
Always tell someone your trip plan and expected return time. This ensures someone will check if you are overdue.
Anatomy Of A Kayak: Understanding Its Build
Before lifting and carrying a kayak, knowing its build is vital. The anatomy of a kayak affects how it moves on water and how it should be handled. Different parts serve various functions, all working together to offer a smooth kayaking experience.
Types Of Kayaks: Shapes & Sizes
Kayaks are not one-size-fits-all. They come in various shapes and sizes, each designed for specific water conditions and kayaking styles. The design influences the kayak's stability, speed, and maneuverability. Understanding the type of kayak helps to determine the best way to lift and carry it.
- Recreational Kayaks: Wide and stable, great for calm waters.
- Touring Kayaks: Long and narrow, built for distance.
- Whitewater Kayaks: Short and robust, made for rapid waters.
- Sea Kayaks: Built with a rudder for ocean currents.
- Fishing Kayaks: Wide with storage for gear and catches.
- Inflatable Kayaks: Light and easy to transport.
Key Parts: The Basics
Kayaks have key parts that each paddler should recognize. These parts contribute to the kayak's performance and handling. Recognizing them ensures proper care when lifting and transporting.
| Part | Description |
|---|---|
| Hull | The bottom of the kayak can be flat, rounded, or V-shaped. |
| Deck | The top part of the kayak is where you sit. |
| Cockpit | The opening in the deck where the paddler sits. |
| Seat | Inside the cockpit for the paddler to sit on. |
| Foot Pegs | Adjustable supports for the paddler's feet. |
| Grab Handles | Located at the kayak's ends for carrying. |
When prepared to lift or carry a kayak, ensure that you grip the grab handles firmly. Check the weight and balance for a comfortable lift. With the basics of kayak anatomy clear, handling these vessels becomes easier and safer, both for you and the kayak.
Preparing To Lift: Safety First
Before you lift a kayak, you must focus on safety. This is not just about protecting the kayak, but also about preventing injuries to yourself. Let's discuss how to prepare properly before you even touch your kayak, to ensure a clean and safe lift.
Warming Up
A warm-up activates your muscles and preps them for the lift. Just like athletes before a game, a few stretches can go a long way. Here's a quick routine:
- Arm circles - Loosen up your shoulders.
- Leg stretches - Get your legs ready for bending.
- Back stretches - Prevent strain when lifting.
Invest a couple of minutes in these exercises, and you'll reduce the risk of muscle strains.
Checking The Path For Obstacles
Your route from kayak storage to the water's edge must be clear and safe. Here's what to do:
- Scan the path for rocks, roots, or holes.
- Move any obstacles you find out of the way.
- Ensure the ground is stable and slip-free.
Safety demands awareness. Take a moment to survey the terrain to avoid trips or drops.

Credit: www.ez-dock.com
Solo Lift Techniques
Kayaking adventures start with a proper lift and carry of your vessel. Mastering solo lift techniques ensures a safe start to your journey. Below are vital strategies for lifting and carrying your kayak when you're on your own.
The Crouch And Slide
Stand alongside your kayak. Ensure your feet are shoulder-width apart. Bend your knees and keep your back straight. Grasp the kayak's cockpit coaming. Tilt the kayak on its side. Slide it onto your thighs. Then, move it toward your waist. This movement minimizes strain.
Using Leg Strength
Never lift with your back. Always engage your legs. Stand at the kayak's midpoint. Keep feet apart for stability. Bend at the knees. Hold the kayak's side with both hands. Lift with your leg muscles. Stand up slowly. Your legs should bear the weight, not your back.
The Shoulder Carry Method
- With the kayak on its side, squat down.
- Slip one arm under the hull.
- Grab the far edge of the cockpit.
- Lift the kayak onto your shoulder carefully.
- Hold the cockpit rim for control.
- Stand up straight and walk with confidence.
This method distributes weight evenly. It makes the kayak feel lighter. Practice ensures comfort and safety.
Tandem Lifts: Teamwork In Action
Lifting a kayak with a friend can make transporting it a breeze. The key lies in coordination and proper weight distribution. Tandem lifts are not just about working together, but also about protecting your back and the kayak. With the right approach, you and your partner can carry the kayak smoothly to and from the water.
Coordinating With Your Partner
Communication is critical when performing a tandem lift. Start by standing on opposite sides of the kayak. Establish who will lead the lift and who will follow.
Here's a simple plan to follow:
- Decide on the lift count, usually "three—one, two, lift!"
- Confirm each person's dominant side to coordinate the lift direction.
- Make sure both partners are ready and have a firm grip.
- Cue each other during set-down to prevent damage to the kayak.
Distributing The Weight Evenly
An even weight distribution ensures a comfortable carry for both partners. Here are the steps to achieve that:
- Stand in the middle of the kayak's length, grasping the cockpit's rim or handles.
- Lean the kayak on its side and split the weight evenly.
- Ensure both partners are holding the kayak at equidistant points from the center.
- Adjust grips if the kayak feels unbalanced at any point during the carry.
Remember, teamwork during the tandem lift not only makes the task easier but also safer.
Transporting Your Kayak
Ready for a paddling adventure and need to move your kayak? Finding a safe and easy transport solution is crucial. You've got options whether you're crossing the city or heading out to remote waters. Below, we'll explore some effective car-top carriers and when using a kayak cart is your best bet.
Car-top Carrying Solutions
Safely securing your kayak to your vehicle is vital. These car-top solutions make transportation a breeze:
- Foam blocks: A budget-friendly choice, these sit on your car roof, with the kayak resting on top.
- Roof rack systems: More robust and secure, they attach to your vehicle's existing roof rails.
- J-cradles: Saving space, they hold the kayak at an angle.
- Saddle racks: These offer a snug fit for the kayak's hull, providing stability.
| Gear | Use Case |
|---|---|
| Foam Blocks | For occasional trips and short distances |
| Roof Rack Systems | Regular transport, long distances |
| J-cradles | Carrying multiple kayaks |
| Saddle racks | Additional security on highways |
Kayak Carts: When To Use Them
For longer treks from your car to the water, kayak carts save your strength. Use them:
- When parking is far from your launch spot.
- If your kayak is heavy or you're solo.
- Over surfaces like sand where dragging isn't ideal.
Kayak carts come in various styles, with features for different terrains. Use pneumatic tires for soft ground and sturdy wheels for rocky paths. Always strap the kayak securely to avoid slips and trips!
Setting Down Your Vessel Safely
Landing a kayak smoothly is vital to protect both you and your vessel. Proper techniques minimize risks and ensure your kayak remains in great shape for future adventures. Below are essential steps for setting down your kayak safely without any mishaps.
Avoiding Impact Damage
Gentle placement is key when it comes to maintaining your kayak's condition. Always aim to lower your kayak to the ground with care. Avoid dropping or dragging as these actions can cause scratches, dents, or even cracks. Ideally, choose a grassy or sandy area for the least impact.
- Inspect the landing surface; remove sharp objects.
- Bend your knees, keeping your back straight as you lower the kayak.
- Place one hand on the cockpit's rim for a secure grip.
- Lower the stern first, then gently ease down the bow.
Securing The Kayak After The Drop-off
Once your kayak touches the ground, secure it to prevent it from rolling away or being carried off by the wind. If it's windy, lay its hull down to reduce wind resistance.
| Step | Action |
|---|---|
| 1 | Place it away from high-traffic areas. |
| 2 | Use a rope or a strap to tie it down if necessary. |
| 3 | Store paddles and gear securely within or alongside the kayak. |
| 4 | Consider using a lock for extra security. |
Remember, a well-maintained kayak provides a safer and more enjoyable experience. Always practice responsible lifting and carrying to preserve the life of your vessel.
Credit: paddling.com

Credit: www.amazon.com
Frequently Asked Questions On How To Lift And Carry A Kayak
What Is The Easiest Way To Carry A Kayak?
The easiest way to carry a kayak is by using a kayak cart or dolly. You can also employ the over-the-shoulder method or have two people carry it at either end for stability.
How Do You Lift A Kayak By Yourself?
Stand alongside the kayak, bend your knees, and keep a straight back. Grasp the cockpit's rim and lift it onto your thigh. Then, hoist it onto your shoulder, balancing the weight evenly.
Can 1 Person Carry A Kayak?
Yes, one person can carry a kayak, especially if it is lightweight or has handles. Using proper lifting techniques is essential to avoid injury.
Conclusion
Mastering the art of lifting and carrying your kayak is crucial for any paddler's ventures. By following the tips outlined, you'll ensure safety and efficiency on every trip. Embrace the journey ahead with confidence, knowing you've got the technique down pat.
Happy paddling, and always remember to lift with your legs!